Saturday, October 11, 2014

Durga Puja 2014 : Doshomi Day Outfit and Makeup Details

Hi Guys!
I know a lot of you have been waiting for this blogspot, and I am extremely sorry for being this late.

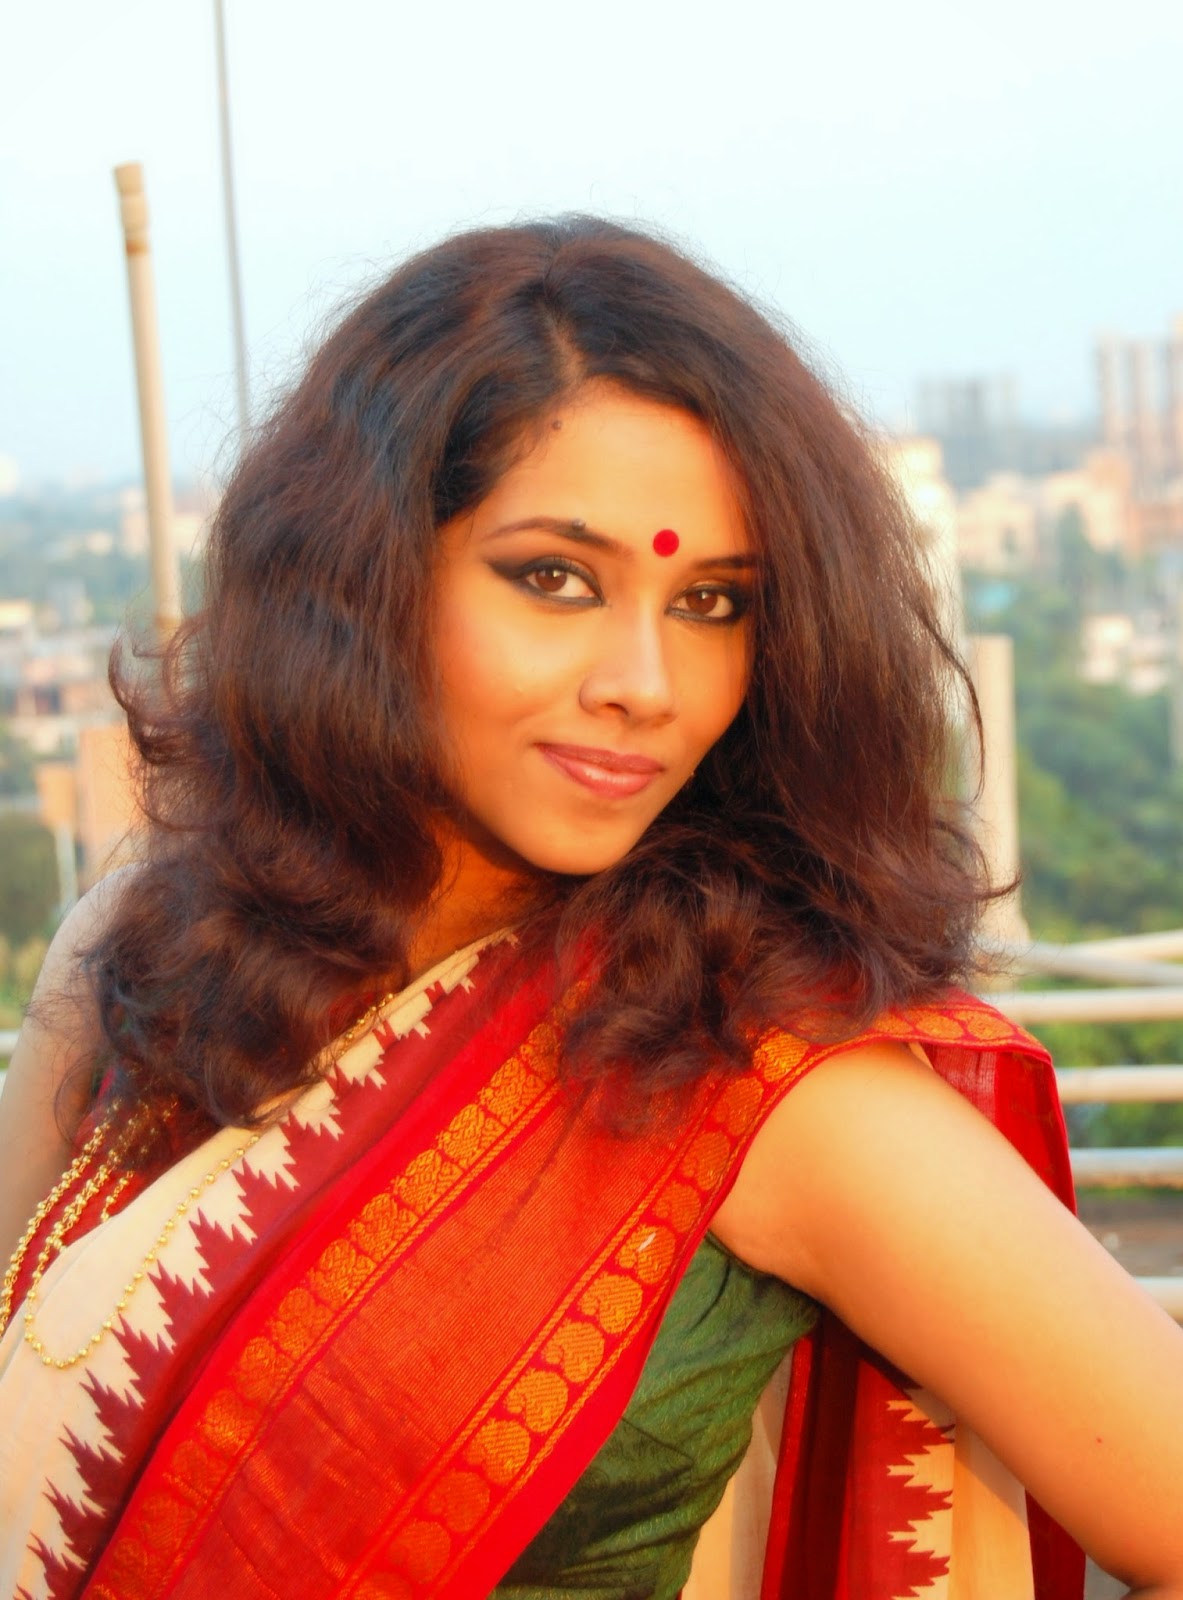
Here are some photos from the Durga Puja 2014. Details are given below :)


Outfit and accessories:
1) Saree: a very ordinary cotton saree, bought from Kolkata, price was around 900 rupees I believe. 
2) Blouse: A green silk sleeveless blouse.
3) Ear ring: gold plated, bought from Aarong.
4) Necklace: From Kolkata, price was around 2500 rupees (has a matching ear ring too)
5) Key ring: Bought from Jaipur, India (a long ago), price was 800 rupees.

Makeup details:

Face:
1) NYX Concealer in Orange to cancel my under eye darkness
2) NARS Radiant Creamy Concealer for concealing under eye area
3) MUFE Duo Mat Powder Foundation
4) MAC Blush in Fleur Power
5) Urban Decay Eyeshadow in Virgin used as highlighter

Eyes: 
1) Lorac Pro 2 Palette
2) Urban Decay Eyeshadow in Blackout
3) MAC Blacktrack Fluidline
4) Cover Girl Lash Blast Mascara
5) L'oreal Voluminous Carbon Black Mascara

For Lips:
1) MAC Cherish
2) Smashbox Bitten

Hope this helps!

Love and regards,
Eeshita.

Sunday, September 28, 2014

An Eye Makeup Using Only Lorac Pro 2 Palette

Hi Guys!

This is an eye makeup I did for upcoming Durga Puja, using only one palette, which is Lorac Pro 2. I got this palette just 2 days ago, and fell in love with it from the very first use :) will write a mini review with swatches later!

now bring out your Lorac Pro 2 Palette and let's get started!

***If you do not have Lorac Pro 2 palette, the you can use any similar shades to create this look. I have included pictures of the eyeshadows to make it easier for you!***

Step 01: Prime your eyelid.

Step 02: Apply the shadow Lt. Brown from the palette into the crease and blend it. This will work as a transition color and also add a little warmth. 


Step 03: Apply the shade called Plum onto the outer V and the crease and blend.


Step 04: Apply Jade onto the lid and gently blend it with Plum.


Step 05: (this step is optional) use the black shadow, which is named as Black, on the outer V and blend it with Plum. This will intensify the outer V area.


Step 06: On the lower lashline, apply Navy and blend with a light hand.


Step 06: In the inner corner, apply the shade Rose to highlight the tear duct area.Highlight the browbone with the shade Beige.


Step 07: Tightline the water line. I have used a blue gel liner for the lower part and black for the upper one. I have done a winged liner just to create extra drama. Apply good coats of mascara and you're done!


Let me know how you find it in the comments below :)

Much love and regards,
Eeshita. 


Friday, September 5, 2014

Haircare Series: Day 02

So this is my second post on #haircareseries :) 

Step 01: apply hair oil on your scalp and on the shaft of your hair. wait for atleast 30 minutes before you apply the mask.

Step 02: take 4-5 teaspoons of any kind of hair mask you want. I used Honey and Milk Protein Treatment. mix 2 teaspoons of hair oil into the mask.


Step 03: mix in 2 teaspoons of crushed fenugreek (methi) seeds.


Step 04: mix 4 teaspoons of milk in the mask. if your hair mask is thick, you might need more milk. 


Step 05: mix an egg yolk.


Step 06: at first I decided not to use the egg white, but later I changed my mind and mixed half of the egg white.


your mask should look something like this.


Step 07: apply this mixture on your scalp and on the body of your hair. do NOT try to massage in as it might break/uproot your hair. 

Wait for 30-40 minutes, or an hour if you desire. 


Step 08: wash you hair properly, then apply shampoo and wash again. Make sure there isn't a bit of the mask left on your scalp or shaft. so rinse VERY well.


Step 09: If you use conditioner (which I do, 365 days) then condition your hair and wash thoroughly. 


that's it! 

result: hair feels softer, more manageable and shiny! I have curly hair as you all know and there are less fly away hairs :D 

Stay connected with my facebook page to get notifications of the next one!

Much love and respect,
Eeshita.

Sunday, August 31, 2014

Haircare Series: Day 01

I tend to spend both money and time behind my skincare, but when it comes to haircare I am really very lazy and careless! May be because my hair is severely curly and tangly and unmanageable, I stay away from hair care, but recently I have realized that this escaping attitude has pushed my hair to become more dry, damaged and unruly :(

So I am thinking to spend some time behind my hair twice every week and I will be sharing whatever I do with you people :D  Please don't hesitate to remind me to do this haircare series and if I miss any day please point out my laziness and scold me :P

Also, if you have any suggestions or if you want me to try any products that might suit my hair, PLEASE let me know in the comments below :D <3 


This is the very first day of this series and I have used some very basic ingredients available at our home to create a mask.

before I start, this series won't have any photogenic photos as taking artistic photos kill my patience lol :P please bear with me <3

Let's start!

Step 01: massage hair oil on your scalp and apply generous amount on the shaft of the hair. you can use Vitamin E capsules if you want. make sure you have oil on your hair at least for an hour before you apply the mask.

Step 02: take some sour curd.


Step 03: take two egg yolks and two tea spoons of crushed fenugreek (Methi) seeds. don't worry about the egg whites, you can always eat them later ;) :P


Step 04: take two tea spoons of honey. 


Step 05: Mix them properly. You can also blend if you want but if you are a lazy bum like me, use a spoon or a fork to mix it!

this is how it should look like:


Step 06: apply this mixture on your scalp and on the body of your hair. do NOT try to massage in as it might break/uproot your hair. 

Wait for 30-40 minutes, or an hour if you desire. 

Step 07: wash you hair properly, then apply shampoo and wash again. Make sure there isn't a bit of the mask left on your scalp or shaft. so rinse VERY well.

Step 08: If you use conditioner (which I do, 365 days) then condition your hair and wash thoroughly. 

that's all!!!

now the result:
My hair feels really soft and manageable after using this mask. I feel like touching them every now and then, which means this mask worked pretty well! 

Stay connected for the next one :)

much love and respect,

Eeshita.

Monday, July 28, 2014

A Little Something I have Tried: Green with a hint of silver!

First of all,

EID MUBARAK EVERYONE! May you have a blessed and happy eid <3

This is another look I was requested to do: a green-black eye makeup with touch of silver. Honestly I was't quite sure about how to incorporate silver in green, so I came up with this.


Let's get into the pictorial.

Step 1: Prime your eyelid.

Step 2: Apply a green eyeshadow base on the lid. you can also use black instead of green.


Step 3: Apply a matte green eyeshadow on top of the eyeshadow base. keep it on the lid only leaving the inner corner empty.


Step 4: Apply a matte dark brown eyeshadow in the crease.


Step 5: Blend the dark brown eyeshadow with a matte warm brown shade. By applying a warmer brown you will add some warmth to the look.


Step 6: Apply a matte black eyeshadow on the outer corner creating a V shape. and blend!


Step 7: Apply green and black eyeshadow on the lower lash line leaving the inner side empty.


Note that, until step 7, I have used all the matte eyeshadows. That way, when I will add silver in the inner corner it won't look over the top.and go back with reapplying the shadows if they lose their intensity.

Step 8: Now, apply a white/silver eyeshadow base in the inner corner of your eye. On top of that apply a metallic silver eyeshadow (that has glittery particles in it) and slightly blend with the green. Be very light handed while doing it, don't drag the shadows on to each other. (I have forgotten to click the part where I applied the silver eyeshadow, really sorry for that)


Tight line your waterlines. Highlight your brow bone with a champagne color. Apply eyeliner and mascara, and you are done!


Here's the complete look!


Hope you like it and do share with me if you recreate the look!

Regards and love,
Eeshita.

Saturday, July 26, 2014

My take on the "No makeup makeup look"

I asked on my Facebook Page which makeup look the page's followers want to see the most, and the most requested one was "no makeup makeup look". So here I am today, trying to demonstrate my take on it.

Let me give a small talk on what "no makeup makeup look" is. Here, no makeup doesn't mean not putting any makeup, rather it means to put on makeup and still look natural. In a nutshell, it means to look JUST like your natural self, just a bit better :)

Products I have used to achieve this look will be listed at the end of the post.

Let's get started!

Step 1: Prime your face according to your skin type and your desired necessities.


Step 2: Apply color corrector if needed. I have terrible dark circles and some hyper-pigmentation, so I have applied color corrector on the areas those need color correcting.


Step 3: Apply under eye concealer. You ca do this after applying foundation as well, but I prefer applying it before foundation.


Step 4: Apply foundation. I love to dot the product on my skin and the blend the product. You can apply your desired coverage. My skin is at it's worst condition right now so I have used a full coverage foundation.


Step 5: This step is totally optional, so you can skip it if you don't need it. Apply Fix+ or any hydrating fixing spray you have. I do this because I feel like this makes my foundation look natural (if I apply a full coverage foundation) and helps to blend even better.


Step 6: Do spot correction with concealer.


Step 7: Set the foundation and concealer with a finishing powder. Blend really well.


Step 8: Contour. Don't go overboard with contouring, that is don't contour too dramatically. Keep it soft and blend well.


Step 9: Of course HIGHLIGHT! your natural skin glows even if you don't put on makeup, so highlight is mandatory (at least that's what I think) :P apply a light color blush on the apples of your cheeks and blend with a very soft hand. Don't make it look obvious that you have added colors to your cheeks.


Step 10: Do your eyebrows. Again, don't make it too arched or too bold and dramatic, keep it soft. If you already have dark and thick eyebrows you can skip it by applying a brow grooming gel only.


Step 11: Apply a warm brown eyeshadow on your crease. This will help to shape your eye. Apply a matte Ivory color on the lid, and blend with the crease color. It'll make your eyes look awake. Apply a shimmery champagne color eyeshadow on the inner tear duct. This will brighten up your whole eye area.


Step 12: Tightline your upper waterline before applying mascara. Trust me, it makes a whole world difference. See the picture below, my right eye (your left) is tightlined and it already helps to shape the lash line better.


Step 13: Apply Mascara and a light pink colored lipstick. If you don't have pigmented lips then you can replace lipstick with a lipgloss. You're done!

This is how you should look with all the makeup products apply. Yourself, just better and flawless :)


Here's a comparison of before and after make up application.


Products I have Used:
1) Smashbox Photo Finish Oil Free Primer
2) NYX Correcting Concealer in Orange
3) NARS Radiant Creamy Concealer
4) Kat Von D Foundation and MAC Face & Body Foundation (mixed two to achieve a darker shade)
5) MAC Studio Sculpt Concealer
6) MAC Prep & Prime Transparent Finishing Powder
7) Smashbox Brow powder in Brunette
8) Urban Decay eyeshadow in Buck and Virgin (Virgin used as Highlighter)
9) Smashbox Lipstick in Bitten
10) MAC Blush in Fleur Power

Let me know if it helps you!

Love and regards,
Eeshita.