Monday, July 23, 2012

A little something I have tried: First Attempt with colors! :D

This look was requested by one of my sister, though the one she asked me to do was far different from the one I have done here. I hope she likes it. And I have done the pictorial for her too :)

Step 1:
Prime your lid at first. I have used Urban Decay Primer Potion in Original.

Step 2:
Start with applying NYX Zumbo Pencil in milk on your lid. Then blend it with a brush or finger. I have used my finger.


 Step 3:
Apply A red eye shadow on the outer V. I have used shade number 109 from Bh Cosmetics 120 Eye shadow palette (please check my BH Cosmetics Palette review here for the reference to the numbering), with MAC 239.


 Step 4:
Fill the outer V slightly with the same shadow and an eye shadow brush, I have used the previous red shade with MAC 239.


 Step 5:
Blend the color well, with a blending brush. I have used MAC 217. Blend upto the two third of your eye crease, leaving one third that is the inner corner untouched.


Step 6:
With the help of an angle brush or any brush you are comfortable with, use a shade lighter than the previous red on the inner blank corner. I have used shade number 110 from Bh Cosmetics 120 Eye shadow palette (please check my BH Cosmetics Palette review here for the reference to the numbering), with MAC 239. Blend the colors with a blending brush, I have used MAC 217.
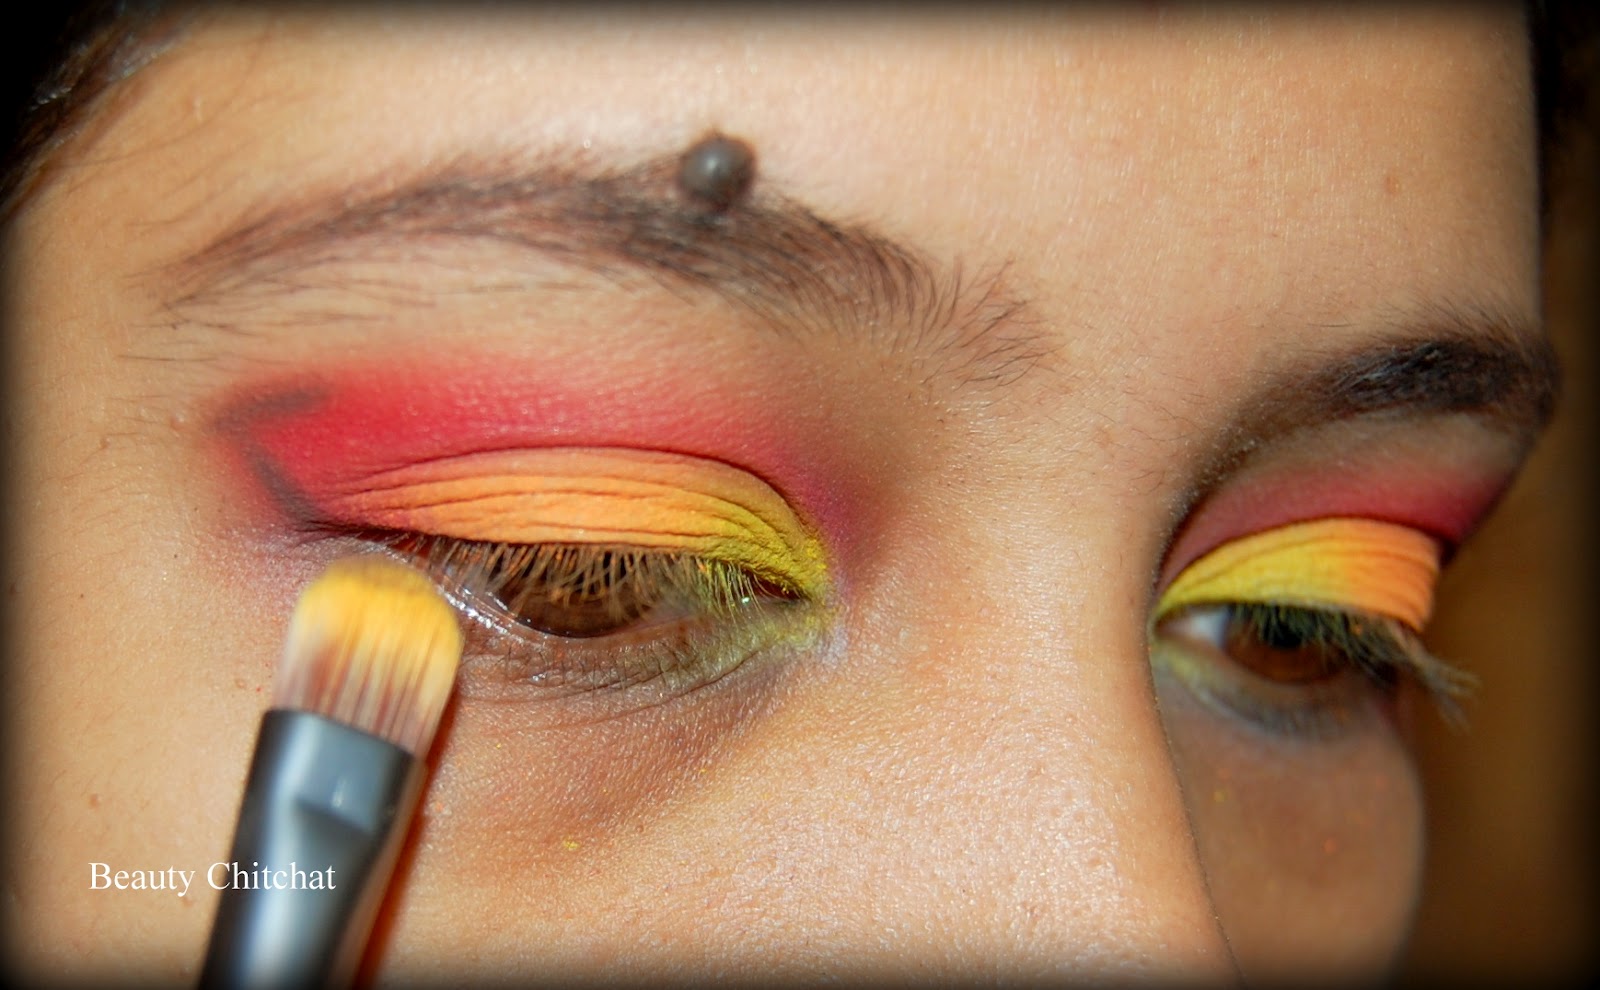

 Step 7:
Now taking a bit stiffer shadow brush, apply an yellow eye shadow on the inner one third of your eye lid. If your eyeshadow isn't enough pigmented and tends to fall out a lot, just try to push/pack the color gently. Avoid sweeping motion, sweeping won't allow you to get a good color pay off. I have followed the same way, and applied shade number 44 from Bh Cosmetics 120 Eye shadow palette (please check my BH Cosmetics Palette review here for the reference to the numbering), with urban Decay Shadow Karma Brush.


Step 8:
using a stiffer brush again and following the push/pack method, apply an orange-ish color on the remaining part of the lid. I have used shade number 54 from Bh Cosmetics 120 Eye shadow palette (please check my BH Cosmetics Palette review here for the reference to the numbering), with with Urban Decay Shadow Karma Brush.


Step 9:
Blend all the colors with a very light hand, using a blending brush. I have used MAC 217 here.


Step 10:

with the help of an angle brush or any brush you are comfortable with, make a V with a deep dark brown, on your outer V. I have used Smashbox Java with urban Decay shadow Karma brush. Blend the brown into the red very well, with a blending brush like MAC 217. you can skip applying this brown shadow, I did this step as only the red-orange-yellow weren't very much appealing on my skin tone :(


Step 11:
With a large Shadow brush apply a matte highlighter on your browbone. I have used Smashbox Vanilla.


Step12:
Tightline your upper water line with a black eye pencil. I have used l'oreal 16hr infalliable carbon black eye pencil. Apply a thin layer of eyeliner on the lower lash line and also apply eyeliner on your upper lash line. I have used MAC Blacktrack Fluidline.


Step 13:
using an angled brush, apply a purple eyeshadow on your lower lash line. I have used shade number 85 and 87 from Bh Cosmetics 120 Eye shadow palette (please check my BH Cosmetics Palette review for the reference to the numbering), with MAC 266.


Step14:
Apply some good coats of mascara. I have used Covergirl and L'oreal Mascara and you are done! :)

Here is the finished look! I haven't done anything with the face so couldn't add any full face photo. If you want to do this look, try to keep your lips nude.


Hope you like it!

Love and respect,
Eeshita.

Sunday, July 22, 2012

MAC Lipstick "THE" Ruby Woo: Swatch and Review!

So here is my MAC's Famous Ruby Woo's review and swatch! I know many of you want to know about this color, hope this review helps you a bit! :)


I know MAC Russian Red has a hype so I tried Russian Red first, and honestly I didn't like Russian Red. This wasn't my red at all :( I tried Ruby Woo at the MAC store and found it too hard and dragging on my skin. I was so dishearten that I though I might not be able to wear any of the famous reds of MAC. Then all of on a sudden I made my mind and picked up Ruby Woo from MAC Store at the Eaton Center, Toronto, Ca.

It was CA$ 17.50 when I bought it, excluding tax.


The packaging is just like other MAC lipsticks of their permanent regular line. It comes with the signature vanilla scent which makes me eat the whole layer from my lips >_<


Its a true matte lipstick and id a retro red! Very bright and blue based, almost opaque in texture, this lipstick would suit any skin tone I believe. MAC describes it as very matte vivid blue red, which is absolutely right! This red has a very classic, vintage vibe! Its true that its very very matte and drags a bit, but this doesn't make the application a mess and it wears like champ!

 I have an experience of wearing this lipstick for over 6hours without fading, that too I live in a warm humid country! This lipstick, to my surprise, survived overly greasy meals(Biriyani and other Indian masala foods, rich in ghee :P ) and didn't feather a micro millimeter! It stains my lips even after its fully gone (after I bite my lips crazily) and I need a good make up remover to remove it fully from my lips. Hats off to you, Ruby Woo! ;)

Just remember to scrub your lips to create a flawless canvas for this lipstick. Or else it might bring out your chapped lips. I use it over MAC Prep+Prime Lip and do I need to say more??? lol

As this is a blue based red, it makes my teeth appear whiter unlike the warm toned reds.

I was always scared of trying out bright red lipsticks, though I absolutely love women with red lips, and I loved the fact that a red lipstick can make a woman utterly sexy, charmingly classy and make her  stand out in a crowd. But I always hesitated wearing bright blue red, but I don't, now, since I have found MAC Ruby Woo.

I have included swatches on my wrist and on my lips too, and I have also included two photos, one before the "Biriyani" meal and one after it :D

Swatch on my wrist

swatch on my lips(without camera flash)

Swatch on my lips (with flash)

Before the meal version ;)

after the meal version ;)

Yes , this is my HG Red Lipstick, and I am absolutely in love with everything about it! I would run and repurchase this bullet throughout my life!

I recommend it to all my friends, girls, give this one a try and you'll know why I am so much in love with this lipstick. Anyone can rock red lips, if they have Ruby Woo in her collection!

Did you use Ruby Woo? Let me know how you feel about it!

Love and respect,
Eeshita.


Monday, July 9, 2012

MAC Lipstick: Cosmo, swatch and review


I was trying to find out a shade similar to L'oreal Colour Juice Stick in Chai Love You in MAC lipstick and the sales lady at that particular MAC counter handed me Cosmo! I paid CA $ 17.50 (excluding tax) for this. 


So the packaging is chic and simple and classy and something I love :P


Cosmo belongs to the Amplified Creme group of MAC Lipstick. and MAC describes it as Pink Coco. I find it a warm shade of pink, and a bit brownish pink. It has MAC's signature vanilla scent to it, which I absolutely adore!

without flash


with flash


The color is pretty cute! Well it washes me out in person, as I am MAC NC 40-42, but I think this will look beautiful on fair skin! But this photographs very very well, I am just thinking to mix it with a brighter pink shade or a plum or red shade to give this color a more lift. but haven't done the experiment yet.....The color is almost opaque and the swatches I did below are result of one swipe only! I feel like camera flash changes the color of Cosmo, but yeah, I am highly confused at times. so please check and let me know if you think like me :P


with flash


without flash


without flash


with flash


me! wearing Cosmo :D :D


this wears for a pretty good time. If you do not have the bad habit of biting your lips (unfortunately I have that), then this color will stay put for 4-5hours; and adding to that, also if you don't eat too much oily food too!

If you want to add a hint of pink on your lips, and you are of warmer skin tone, you can think of giving Cosmo a try. Darker skinned girls like me can find this color washing them out, but it will rock a fair skinned girl!

Hope this helps!

Much love and respect,
Eeshita.

P.S.: this shade is nowhere near to L'oreal Colour Juice Stick in Chai Love You by the way :P

MAC Mineralize Skinfinish Natural: my HG product as a setting powder or as low coverage foundation!!!! :D

MAC Mineralize Skinfinish Natural, quite a mouthful name, has been on top of my wishlist for a long time! finally, I could cut the name out of my wishlist! yesssssss!!!!


What MAC says about the product: "A luxurious domed face powder with minerals, slowly baked to provide a dimensional yet natural-matte finish. Provides perfect low coverage. Use to set and fix foundation or as a touch-up throughout the day."

My verdict on the product? you have to read more! :D

I bought mine from Dubai International Airport's Duty Free MAC Counter, which is NOT duty free I guess because they charged me USD 32 where as MAC website and out of airport stores charge USD 29.

Coming to the product:
This is my ABSOLUTE Holy Grail product, I can swear by this thing any time! I am NOT going to try any more products (without MAC Select Sheer Loose Powder) and this will always occupy a place in my make up collection.You can see how much I love this product if you see the pictures below, which compares the size of the dome of a new product and my one! And it has been only 3months since I have bought this. (bottom one is mine and top pic is taken from MAC's website; look at mine!!!! the dome is already flat!!!!!!!!!)


 The packaging of this compact is nice and sleek, doesn't come with any applicator though.


I have MAC MSFN in Medium Dark and I have used NOTHING (till date) that matches my skin tone so perfectly like this one does. Its like wearing my skin, just a better skin! It's just WOWWWWWW!!!!


Its a finely milled powder, and is beautifully pigmented and isn't chalky at all!! It never creates any grey cast on my face, I never had any break out issues with this product, in one word, its amazing!


I use it over my foundation to set it, with a kabuki or a large powder brush. It sets my foundation perfectly and adds a healthy glow to my skin.

You can use it on bare skin too, but as it is very much low in coverage so it doesn't do much with hiding any imperfections, but does illuminate which I love!

And YES, I do use it as my foundation too, when I am in hurry or too lazy to apply any foundation. How? I dampen my flat top kabuki brush either with water or with MAC Fix+, then swirl it on to the product and apply on my face. But, if I need a bit more coverage, I use a little bit of concealer prior to the application of MAC MSFN. I do get the BEST result pairing it with the Fix+, water does well too, but just a teensy bit better coverage is achieved if I use MAC Fix+. Result? you can check my photo below, where I am wearing no foundation, only MAC MSFN and Fix+ :) :) and a teensy bit of concealer to hide my dark circles.


Well, it doesn't stay matte for a long time, this is one negative point of this product, specially with oily skins like mine. I have to reapply it if I use it on top of my foundation.

It just adds the perfect radiance I always wanted to see on my face. I can't express how much I love this product! I am going to run and repurchase this one even if tends to hit the pan. Sorry to be such a drama queen, but I can't help to control my emotions when I talk about this product lol :P

I recommend this for the oily skin girls, or even for the dry skin ones, or even for the normal skin girls. Try it out girlies, you will fall in love for sure!

Have you used this product? Love it? Let me know!

Much love and respect,
Eeshita.

Sunday, July 8, 2012

A little something I have tried: Despite disliking purple, here's a purplish look!

I don't like Purple, not at all... Its just NOT my color... I can never pull it off, NEVER! but my friends wanted me to do purple-ish look so here I am with purple... another pictorial for all my purple lover friends :)

Step 1:
Prime your lid at first. I have used Urban Decay Primer Potion in Original. If you are a bit heavy handed and still want a sharp line, apply a tape on the outer corner.

Step 2:
Start with applying a shimmery purple color which has a lot of glitters to it on you lid with a eyeshadow brush. if yo don't have any glittery purple, don't bother, you can add some glitters later. And anyways, my glitters didn't stay there after blending, so glitter isn't a big issue lol :P I have used Smashbox Amethyst using MAC 239.


Step 3:
Apply a plummish pinkish purple (sorry can't describe colors) on the outher portion of your lid, using an eyeshadow brush again. I have used Smashbox Frambois with MAC 239.


Step 4:
Apply a darker plummish purple, which has a strong reddish brown undertone on the outer V with a eyeshadow brush. I have used Smashbox Cabernet with MAC 239.


Step 5:
Slightly bring the plummish purple into the one third portion of your lid. I have used smashbox Cabernet with MAC 239. you can also use an angled brush to do this.


 Step 6:
Use that plummish purple onto the outer half of your lower lashline. I have used Smashbox Cabernet.


Step 7:
Use the plummish pinkish purple on to the inner half of your lashline and blend the two colors. I have used an eye shadow brush to do this. you can use an angled or a pencil brush to do this. (I was too lazy to change the brush lol)


Step 8:
Using a clean blending brush start blending the colors on your crease. I have used MAC 217. Its "blend blend blend" time!!! :D


Step 9:
Using a pencil or dome shaped brush use a shimmery pinkish color (that has a slight purple undertone to it) to the inner corner of your eyes. Bring it slightly to the inner one third of the crease and blend blend blend with the darker shade of the crease. I have used Smashbox Rose with a No 7 brush.


Step 9:
Apply a blue eye pencil on your lower waterline. As i have lost my blue eye pencil, so I have used Smashbox gel liner in Picasso with MAC 266.


Step 10:
Apply a matte highlighting color to your brow bone. I have used Smashbox Vanilla.


Step11:
Tightline your upper water line with a black eye pencil. Apply a thin layer of eyeliner on the lower lash line, and lightly smudge it to blend with the colors you applied before. Apply eyeliner and some good coats of mascara. I have used MAC Blacktrack Fluidline and Covergirl and Loreal Mascara. I have skipped clicking these steps as I already got tired! phhheeeewwwww :P

Here are some (actually a lot) images of the complete look. I don't have any full face look today, purple made me tired lol but I have clicked some photos with diffused flash, so I will categorize them accordingly :)

Diffused flash:


With Flash:


Without Flash:


hope it helped! Let me know if you have any suggestions on the areas to improve!

Much love and respect,
Eeshita