Tuesday, July 30, 2013

Review: KORRES Wild Rose + Vitamin C Advanced Brightening Sleeping Facial


I have been trying for a long time to write a review for KORRES Wild Rose + Vitamin C Advanced Brightening Sleeping Facial, but I am too lazy to write about skin care products. But here I am today, going to talk about this skin care item. If you want to know more about it then keep reading.


This is my first high end brand skin care product I bought with GREAT interest. I bought this product last year during the holiday season and it came with the Wild Rose Daily Brightening & Refining Buff Cleanser (review here) and I had to pay the price for the Sleeping Facial only, which is USD 48. Pretty good deal, eh? Oh I got it from Sephora. It comes in a glass jar with a plastic lid and there's another plastic thin layer to keep the product even more air tight.


About Korres: it's a Greek beauty company founded by Greek's oldest Homeopathy pharmacy. Korres is famous for making products that are natural and certified organic. 


This particular product is one of the best sellers of Sephora and I bought it without doing much research or anything, but yes, I was damn excited to try it out as soon as the packet arrived. It's a facial in a jar, that comes with wild rose oil, an ingredient famous for giving a natural healthy glow to the skin. I heard many talking about it's overwhelming fragrance but it NEVER bothered me much as I am a fragrance freak and personally I found the smell of roses really really relaxing! The wild rose extract is also a source of Vitamin C which soothes the skin, so as a result I never felt any irritation either. It contains 15% rose water for soothing skin and vitamin E, soybean oil, rosemary leaf extract, rose hip oil and jojoba for moisture as well.


This product is supposed to help even out skin tone and repair the look of fine lines. I don't know about fine lines as I didn't have any at least when I started using it, but I also, didn't see any spectacular change in the unevenness of my skin tone in 14 days (as claimed by the product) which is my primary concern always. But yes, when I continued using this product without any break, my skin texture improved dramatically, and the unevenness of my skin tone was less visible. The disappointment is that, once I stopped using this for a while the unevenness came back withing a couple of days. 


The texture of this cream isn't too heavy or too runny, it's just a medium thick cream that absorbs in the skin like magic. It's really really non greasy and non oily and non sticky. Absorbs in the skin super fast leaving no unpleasant greasy feeling behind. I have used it in the scorching summer of my country and never felt any extra oil added to my skin by it. The following pictures demonstrates it.


The way I used it: at night, 30 minutes before I hug my bed, I put a layer of this product on my face and wait for couple of minutes for the product to sink into my skin. The reason I applied it 30 minutes prior to sleeping is that I wanted this product to stay put on my skin, not transfer on my pillow. It's a leave on facial, you don't have to rinse it off.

Whenever I used this product, no matter how bad my skin condition was that time, I always woke up with a radiant glowing skin next morning, a plumped up skin that I frequently kept touching. I remember being too much stressed and depressed at that particular time and my skin was freaking out, but this product took care of my skin like a mother. My skin never felt deprived of the utmost care it needs and never left my skin looking stressed out or unloved ;)

2-3 times in a week I used to pair it with the exfoliator I received with the kit, and the skin felt amazing the next morning!


The shelf life of this product is 6 months only :( but I am glad that I depleted the product within 5 months :D


Though it didn't do anything remarkably good for the unevenness of my skin tone specially when I stopped using it, but still it's an absolute repurchase for me!


Did you use Korres wild rose sleeping facial? let me know how you find it.


Love and regards,

Eeshita.

Sunday, July 28, 2013

MAC Lipstick: Rebel, swatch and review!


I know I am late in reviewing this legendary lipstick but better late than never. And I also know that there are thousands of reviews out there but I think, my verdict on this lipstick also counts ^_^ so here I go!

Bought from MAC, priced at USD 15 (excluding tax), Rebel comes in MAC's  "that-pretty-black-case" packaging of their permanent line's lipsticks. It belongs to the Satin Category and carries the same signature vanilla scent.


The color of this lipstick as MAC describes is Midtonal Cream plum. For me, Rebel is a deep berry shade and has a slight sheen to it. The undertone of this lipstick is different in different lights, and on different skin tones and on different lips. On my skin tone and on my lips,under different lighting  sometimes it shows a fuchsia undertone, sometimes a bit purple, and of course red at times. But I find it is more berry than the Guerlain Orgueil (swatch and review here), which has a more red tone to it. I have seen people describing it as different colors, so I believe Rebel is a multi-dimensional color ;) The color that shows in the tube is very vampy, but when you put it on, it's a very wearable one. 


As it's a Satin finish lipstick, it's softer and silkier in application than the matte finish ones. It glides on effortlessly on lips and is opaque at one pass, which is a blessing for pigmented lips like mine. But due to it's creamier consistency, it might bleed a bit, so I would suggest to pair it with a lip liner or wear a lip primer before you put this lipstick.

The color stays put for around 5 hours (without my bad habit of biting lips) and leaves a lovely stain behind.

The swatches of this lipstick are given below:


I use Rebel in two ways:
1. just dab the bullet on my lips to get a hint of color and it looks really natural and beautiful!
2. To get a sultry vampy look, I wear it full on and it's an aaahh-mazing shade to express boldness!

meeee wearing Rebel :D

Pair it with a smokey eye or classic pin up eyes, it goes with everything, suits almost every kind of skin tone and flatters anyone who wears it. Rebel immediately brightens my face when I wear it, no matter how dull my face is on that particular time.

An absolute repurchase for me.

Let me know what you feel for Rebel in comments.

Love and regards,
Eeshita.

Tuesday, July 16, 2013

Review: Make Up For Ever Duo Mat Powder Foundation


I am currently on a spree of trying out different foundations. No, nothing is wrong with my NARS Sheer Glow Foundation, I just thought to give some other foundations a try and moreover, I am hunting a good powder foundation so that I can apply it whenever I want (yes i do find applying liquid foundation can be a bit too much time consuming when I am feeling extra ordinarily lazy, that is most of the times). Make Up For Ever Duo Mat Powder Foundation is so highly raved that I wanted this particular one to be the first powder foundation I should try (after MAC Studio Fix, I gave up using it as it broke me out, weird!).


It is USD 34 and I got mine from Sephora, and Sephora is the exclusive beauty retailer for this product.

How  Sephora describes this powder as:
What it is:
A long-lasting, oil-free mattifying powder foundation for normal to combination skin types.


What it is formulated to do:
Provides a shine-free finish that covers blemishes and other imperfections and perfectly evens out the skintone.

-A testing panel composed of twenty-two adults (via 24 patch test) showed this product to be non-irritating. 


As you know residing in a hot humid country and having a super oily skin isn't a very great background for make up. Specially when it comes to foundation, nothing can hold my oil mines from producing gallons of oil! So I am always on a hunt of getting my hands on some products that will keep my oil away, but haven't come across anything yet.

The shade I use is 205 which is Medium Beige. For reference, I am in between Barcelona and Syracuse in NARS Sheer Glow Foundation, and in between NC 35 to 40 in MAC Studio Fix Powder, NC35/NC37 in MAC Mineralize Cream Foundation, C4 in MAC Face and Body Foundation, Medium 54 in Kat Von D Lock It Tattoo Foundation.


The packaging of this powder is very slick and classy, and reminds me of MAC Studio Fix and Mineralize Cream Foundation. But unlike MAC's above mentioned foundations, it comes with a half mirror, which I find is a bit weird. It comes with a sponge and has a separate compartment for it.


The shade is a bit lighter than my skin tone and isn't too yellow based, but has rather a beige undertone to it. The pigmentation of this powder is awesome and looks really natural right after I apply it.


I apply this powder with a big powder brush, or a blush brush for a light to medium coverage. If I want a bit more than medium coverage I apply it with Sigma F80 (review here). It applies ok when used with the sponge it comes with, I just have to be very careful while applying with the sponge as the sponge can leave streaks behind. I also apply it wet, I dampen the sponge with water and dab it on the foundation and apply it. This way I get the maximum coverage from this foundation, but I have to be REALLY careful about the blending as sponges leave cakey strokes of application behind. The following two photos are from my before and after application of MUFE Duo Mat Powder Foundation.


The raved reviews of MUFE Duo Mat Foundation grabbed my interest as many claimed it to be really matte and having oil control power. I invested with a great hope and if you want to know my verdict, keep reading!

The powder foundation itself does NOTHING to control oil! yes, it's the word NOTHING! When applied alone, without any primer, my oil starts showing around 1 hour, that too while I am staying at indoors (no air condition), and around 2-3 hours it starts oxidizing terribly and the trace of foundation is almost gone! The following photos will describe it better. The first one was taken right after I completed my whole make up, second one was taken around an hour after I applied my make up (still indoor) and the third one was taken after I went out for a couple of hours and returned home.


I tried it with a primer. I applied Smashbox Photo Finish Oil Free primer and then applied this. The wear of this foundation prolonged for like half an hour more, but started wearing off and oxidizing right after that!

This foundation stays really put for a longer time when applied wet with the sponge. I had a wear of around 4 hours (without any primer and staying indoors only) before it started oxidizing and wearing off. But whenever I hit outdoor, it started melting and oxidizing around 3 hours (applied on primer as well).

I still have to try it during the colder and drier weather. I have to give it a try and see if it works then. So in spite of being a crazy summer loving person, I am eagerly waiting for winter this year! I hope I will have a better update then. So there will be an updated review on this around the month of December hopefully!!

Did you use MUFE Duo Mat Powder Foundation? How do you find it? Let me know in comments!

Love and regards,
Eeshita.


Sunday, June 30, 2013

Review: Sigma F80 Flat Top Synthetic Kabuki Brush


After using almost for 9months, here I am with the review of famous Sigma F80 Flat Top Synthetic Kabuki Brush, which is highly raved by the beauty gurus almost all over the world! If you want to know my verdict on it, then please keep reading.


The brush retails for USD 18 now, but as far as I remember when I bought it a year ago it was USD 16. It's available here!

This comes with a plastic cover for the bristles which I have lost fyi :P lol that explains me better!

The handle is sleek, black and very sturdy, not too long and some might find it a bit short for their palm. But I am absolutely fine with it and I feel it gives me more control while using the brush. The brush is made up of wood and the metallic ferrule is of high quality! On the metallic ferrule Sigma has their name signed on which I think is an absolute elegance (not visible in the photo though).


The thing that attracts me the most is the bristles of this brush is synthetic, that is cruelty free!

The bristles are super dense and super soft. It doesn't feel scratchy against the skin. I have never noticed any streaks or brush strokes after I applied any kind of product (starting from liquid to cream to powder) with this brush. It blends cream and liquid foundation like dream! and due to its dense bristle, the foundation is applied smoothly, just like I want it, either medium or full coverage. I haven't noticed a single shredding till date.


I even use it to apply powder foundation and get the maximum coverage when I use with it. One of my most favorite thing is I apply MAC MSFN with this brush and some MAC Fix+ and almost get a full coverage without using any foundation!

the only downside of this brush I found is that it takes a long time to dry. Since I am very much impatient, it's a downside for me.

I am very much pleased with this brush. It has become a staple in my brush collection.

I would recommend it to anyone who is looking for a flat top kabuki brush.

Do you own this raved brush? How do you find it? Let me know in comments!

Love and respect,
Eeshita.

A Little Something I have Tried: Back to Green again :P


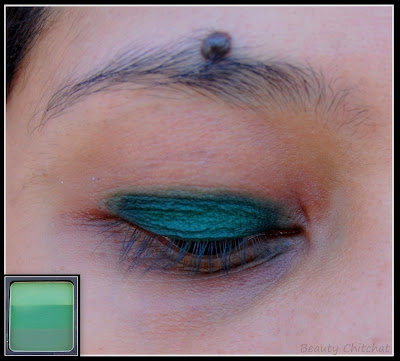
So this is an eye make up I tried when I was super bored and had nothing to do :P I am going through a very bad dark circle days (though I am getting over with it now, very slowly but yes) and it's so prominently visible in the pictorials! please ignore that :/

let's get started!

1. Start with primed eyes. I have used UDPP in Original.

2. Apply a black base. I have used NYX Jumbo Pencil in Black Bean. You can also use any black gel liner.


3. With an eyeshadow brush, apply a dark emerald green eye shadow on top of that black base. I have used MAC 239 and used the bottom two eyeshadow from this Inglot rainbow eyeshadow square (forgot the shade name!)


4. Apply a dark brown color on the outer V and blend it halfway through the crease. I have used MAC 217 and Urban Decay Darkhorse eyeshadow.


5. Apply a taupe-ish color in the crease and blend it well. I have used MAC 217 and Urban Decay Hustle eyeshadow.


6. Apply a golden eyeshadow in the inner corner. I have used Smashbox Ambient.


7. With a stiff shading brush like Sigma E20 apply the dark brown eyeshadow on the outer one third of the lower lash line and apply the green eyeshadow in the rest inner part. Blend it with a pencil brush like Sigma E30.


8. Apply eyeliner, tighline your waterline and add mascara! you're done!!!


Let me know if you like it!

Much love and respect,
Eeshita.
Monday, June 17, 2013

My foundation routine for party make up

Past few days I have been getting tons of compliments about my skin! And as a result I was requested to do a skin care routine and a foundation routine. I have already started a skin care routine series and this is going to be my first post on my foundation routine.

Well I don't follow these steps for regular or usual foundation routine. I tend to go for lighter foundation base as too much foundation makes me uncomfortable and always reminds me I have tons of layers on my skin. My skin feels heavier :/

But I do follow this particular steps for party make up. I believe this kind of foundation routine can also be applied to the brides for their wedding programs, like "Gaye Holud", Engagement Party and other stuffs. I have already done an engagement party make up on a bride following these steps and was hugely appreciated!

Though I am calling this my foundation routine, I have also tried to explain my contouring and highlighting ways briefly here.

Also I have tried to explain "why I do what I do" wherever I feel it's necessary.

Please note that, these are the steps that I follow to make my face flawless and to hold the make up for longer time as my skin is super oily and my make up tends to wear off as soon as I start applying. So I religiously follow these steps to keep my make up in place. You can always remove/ignore any steps you don't feel you need.

Oh one more thing! This post contains the WEIRDEST possible pictures ever clicked on me!!!! I look weird, mad, crazy, unorganized, stupid and what not!!!!! So please never mind for them :)

So let's get started!

Step 01:
I start with spraying UD De Slick (review here) all over my face and then let it dry.


Step 02:
I apply oil control primer on my T-Zone. I use Smashbox Photo Finish Foundation Primer (Oil Free version).


Step 03:
On the rest of the face specially where I want it to glow and reflect some light, I use MAC Prep & Prime Skin Base Visage (review here).


**I always wait for 15-20minutes after I apply my primer and before I start applying my foundation.

Step 04:
Then I apply my eye primer and I use UDPP in Original which is my HG primer till date (review here).


Step 05:
This is the first layer of foundation I apply. My favorite foundation is NARS Sheer Glow foundation and I use two shades to get a perfect match to my skin tone (detail review and swatch here). I dot the foundation all over my face and then I take my favorite foundation brush which is Sigma F84, spray some MAC Fix+ (review here) on the bristles and start blending the foundation.
The reason I spray Fix+ is I want my first layer to be sheer.


Step 06:
When I apply my first layer of foundation, I apply two dots in the inner corner of my eyes. I don't blend them with the foundation brush and Fix+, instead I blend them with a eyeshadow blending brush like Sigma E40.


Step 07:
Then I spray UD All Nighter Make Up Setting Spray (review here) all over my face and let it dry.


**After this step I move onto my eyes and do the eye make up, if I am doing a heavier eye make up and there are chances of fall outs.

Step 08:
After I am done with my eye make up (if you want to see a step by step pictorial of the eye make up then click here) I come back to my face again. It's time to apply the concealer. I use MAC Studio Sculpt Concealer (review here) on the spots that I need to hide excluding under eye circles. I apply this concealer with a stiff brush and keep dabbing it with my fingers until it sets and blends with my skin.
The reason I use this concealer with my fingers and use dabbing motion is that I think the heat from my fingers help this concealer to set well on the skin.


Step 09:
Then I spray UD All Nighter again to make sure that my concealer doesn't move.

Step 10:
This is when I apply the second layer of foundation. Foundations generally oxidize a lot on my face so this time I use only the lighter shade of NARS foundation which is Barcelona. I dot it on my face and this time blend it with a dry brush without MAC Fix+ to achieve a bit more coverage.


Step 11:
If you can see, my under eye circles are still visible and now it's time to conceal them. I use NARS Radiant Creamy Concealer in the shade Custard. I apply as much product I need under my eyes and then blend it again with an eyeshadow blending brush and that is Sigma E40.


Step 12:
It's time to set my under eye concealer. With the help of Sigma E40 again, I lightly apply MAC Select Sheer Loose Powder under the eye where I have applied my concealer. Sorry forgot to click my camera :/


Step 13:
I tend to apply a powder foundation on top of my liquid one as I believe it helps my make up to stay put for a longer time. With a blush brush like Sigma F05 I apply MUFE Duo Mat Powder Foundation. You can use any other powder foundation like MAC Studio Fix which is a great powder foundation of all time.


Step 14:
Doesn't my face look like a dead piece of meat? yes, it's time to bring back colors to my face. With a darker shade than my skin tone, I start contouring my cheeks, nose and hairline. You can use anything to do this part starting from eyeshadow to bronzer to a dark blush. Just make sure it's 2-3 shades darker than your skin tone and that you blend well so that there isn't any visible harsh line. I have used Sigma F05 brush for contouring my cheeks and MAC 217 brush to contour my nose. The shade I have used is Urban Decay Eyeshadow in Buck.


**I also do my eyebrows in this step but as I suck doing eyebrows so I intentionally avoided clicking photos for this step :P

Step 15:
Time for a little color on your cheeks. Apply a blush on your cheeks. There are various ways of applying blushes and you can pick your way that suits you the most. I tend to apply my blushes slightly away from the apples of my cheeks. I have used Smashbox Posy Pink blush with the help of Sigma F05 again!


Step 16:
Who doesn't want their face to look glowy? I absolutely LOVE LOVE LOVE to highlight my face, specially my cheekbones. I kind of have high cheekbones and I love highlighting them. With an eyeshadow blending brush like Sigma E40, I pat highlighter on the cheekbones, on the bridge of my nose, on my temples, and on my chin. You want to highlight the parts of your face where the light will hit more and the parts you want to accentuate more. I used my favorite highlighter here, which is an eyeshadow fromUrban Decay and it's Virgin! :D


Step 17:
Blend the contouring shade, blush and highlighter with a large powder brush like Sigma F30.


Step 18:
I know you may find it weird but I love to lock everything with a transparent finishing powder and my favorite is MAC Prep & Prime Transparent Finishing Powder (Review here). Again with a large powder brush like Sigma F30 I apply this powder very lightly all over my face excluding the eyes ofcourse. Then again seal the whole make up with UD All Nighter Spray again! Again No photos of this step :/

Yes!!! I am done!!! I know it's a lengthy process and requires a lot of products, but I have learnt to come to this routine after a lot of research and experience on my skin and I find this works better for my skin.


Also, I have paired both lighter lip colors and darker lip colors. Let me know which one you like most!

Please DO make sure that you always apply foundation and setting powder on your neck and ears and the related bare skin to match your face. I haven't applied anything on those parts here as I was lazy and I wasn't going out anywhere :P

Let me know if this routine was helpful for you in comments.

Love and regards,
Eeshita.