I had a party to attend and was planning on to do a pin up look, then I suddenly realized its been long since I posted a new look for my girls. So thought to do something interesting and colorful, instead of the pin up look, and this is where I have reached! As you can guess, I was obviously late for the party, as I had to do a step by step pictorial.... :P
Enjoy!!!!!
Step 1:
Prime your lid at first. I have used Urban Decay Primer Potion in Original.
Step 2:
Start with applying NYX Jumbo Pencil in Milk on the inner half of your lid. Then blend it with a brush or finger. I have used my finger.

Step 3:
Apply NYX Jumbo Pencil in Black Bean on the outer corner of your lid.

Step 4:
Apply NYX Jumbo Pencil in Dark Brown beside the Black Bean and blend them together.

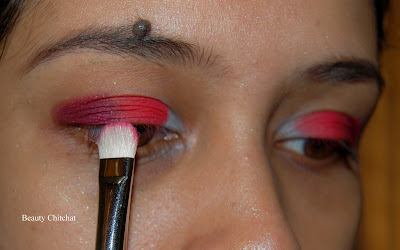
Step 5:
Apply A red eye shadow on inner one third where you have applied NYX Jumbo pencil in Milk. I have used shade number 109 from Bh Cosmetics 120 Eye shadow palette (please check my BH Cosmetics Palette review here for the reference to the numbering), with MAC 239.

Step 6:
Apply a little bit darker eye shadow than the red one you have used before. where you have applied NYX Jumbo pencil in Black Bean and Dark Brown. I have used shade number 107 from Bh Cosmetics 120 Eye shadow palette (please check my BH Cosmetics Palette review here for the reference to the numbering), with MAC 239.
Step 7:
Taking a deep plum-burgundy eye shadow on the tip of the eye shadow brush or with an angled brush, apply to the outer V of the lid and fill in the V with that color.

Step 8:
Its time to blend blend blend! I have used MAC 217 blending brush.

Step 9:
Take an orange eye shadow and start blending the color on the crease. I have used shade number 54 from Bh Cosmetics 120 Eye shadow palette, with MAC 217.

Step 10:
Taking a little bit of golden eyeshadow on the tip of your blending brush, apply it over the orange color you have placed before on your crease. This will add an extra hit to the orange. I have used Smashbox Ambient with the help of MAC 217.

Step 11:
Go back and re apply the red and the plum-burgundy color so that they stand out a bit. Don't forget the blending!

Step 12:
Apply a golden eyeshadow on the inner most corner of the eye, around the tear duct. Blend properly. I have used Smashbox Ambient.

Step 13:
Apply the plum burgundy color on your lower lash line with help of an angled or a pencil brush.

Step 14:
Now this step is totally optional. You can put a little black eye shadow on the outer V of your lid. I have used Smashbox Blackout just to add some depth to other colors.

Step 15:
Tightline your upper and lower water line with an eye pencil. I have used l'oreal 16hr infalliable carbon black eye pencil.

Step 16:
Highlight your brow bone.

Step 17:
Apply eyeliner on your upper lash line. I have used MAC Blacktrack Fluidline. Apply good coats of mascara I have used Covergirl Lash Blast Volume Mascara.
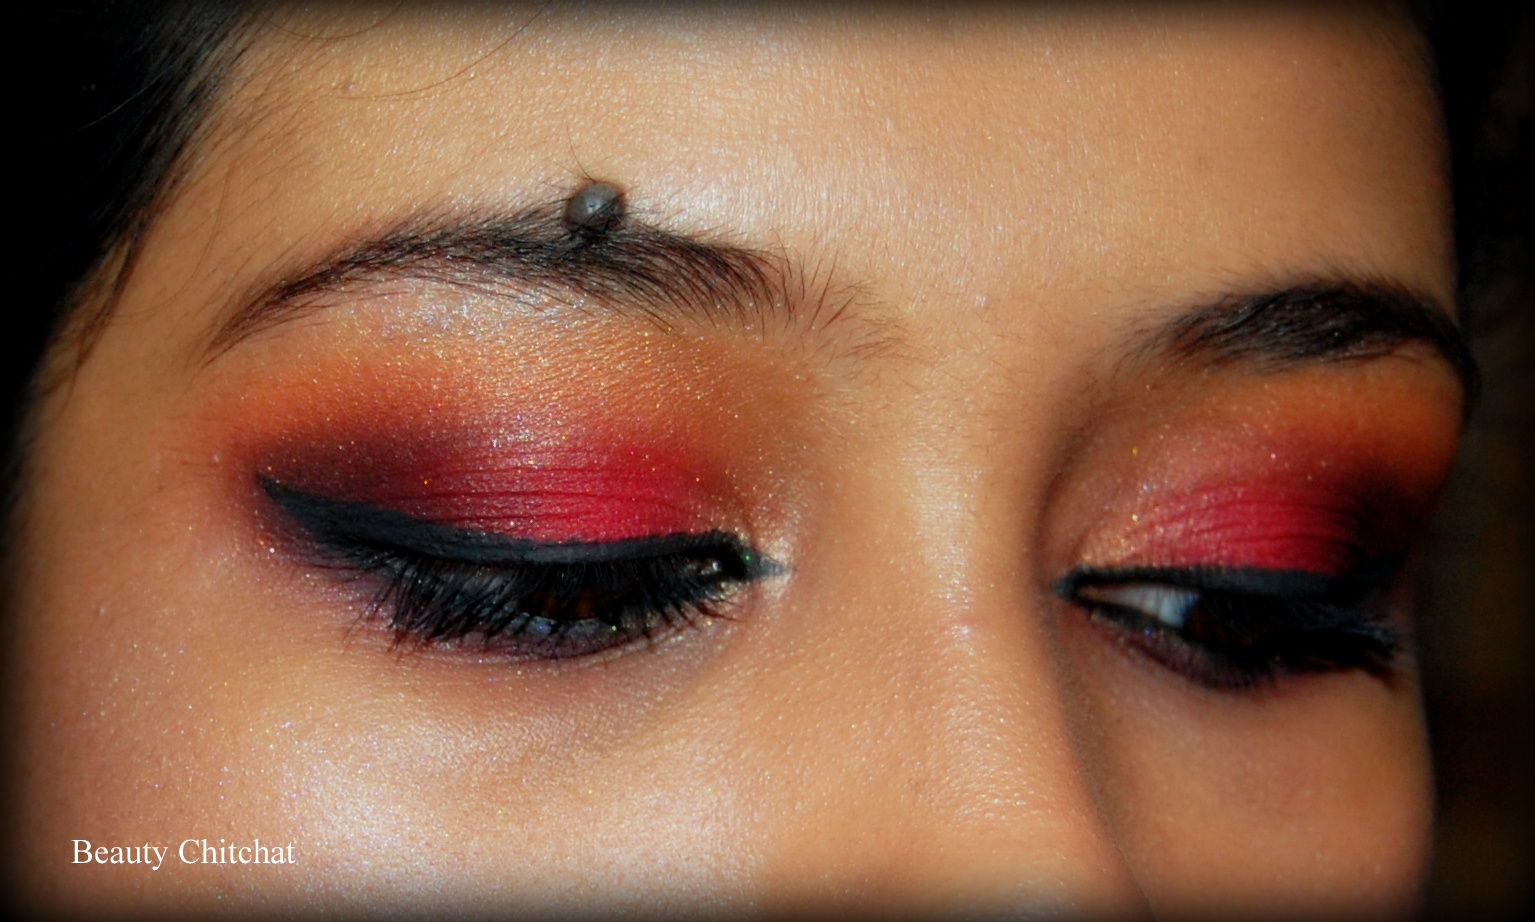
You are done! Here's the complete look:


For face~
*Urban Decay De Slick Oil COntrol Spray
*Bare Escentuals Prime Time Foundation Primer
*MAC Prep+Prime Skin Base Visage
*MAC Mineralize SPF 15 Foundation
*NARS Sheer Glow Foundation
*MAC Studio Sculpt Concealer
*MAC Mineralize Skin Finish Natural
*Smashbox Softlights in Lens and Shimmer to highlight my cheekbone
*Estee Lauder blush in Rose wood
For Lips~
*MAC Prep+Prime Lip
*NYX Mega Shine Lipgloss in Gold Pink
Let me know your opinions about the look!
Love and respect,
Eeshita.
Enjoy!!!!!
Step 1:
Prime your lid at first. I have used Urban Decay Primer Potion in Original.
Step 2:
Start with applying NYX Jumbo Pencil in Milk on the inner half of your lid. Then blend it with a brush or finger. I have used my finger.

Step 3:
Apply NYX Jumbo Pencil in Black Bean on the outer corner of your lid.

Step 4:
Apply NYX Jumbo Pencil in Dark Brown beside the Black Bean and blend them together.

Step 5:
Apply A red eye shadow on inner one third where you have applied NYX Jumbo pencil in Milk. I have used shade number 109 from Bh Cosmetics 120 Eye shadow palette (please check my BH Cosmetics Palette review here for the reference to the numbering), with MAC 239.

Step 6:
Apply a little bit darker eye shadow than the red one you have used before. where you have applied NYX Jumbo pencil in Black Bean and Dark Brown. I have used shade number 107 from Bh Cosmetics 120 Eye shadow palette (please check my BH Cosmetics Palette review here for the reference to the numbering), with MAC 239.

Step 7:
Taking a deep plum-burgundy eye shadow on the tip of the eye shadow brush or with an angled brush, apply to the outer V of the lid and fill in the V with that color.

Step 8:
Its time to blend blend blend! I have used MAC 217 blending brush.

Step 9:
Take an orange eye shadow and start blending the color on the crease. I have used shade number 54 from Bh Cosmetics 120 Eye shadow palette, with MAC 217.

Step 10:
Taking a little bit of golden eyeshadow on the tip of your blending brush, apply it over the orange color you have placed before on your crease. This will add an extra hit to the orange. I have used Smashbox Ambient with the help of MAC 217.

Step 11:
Go back and re apply the red and the plum-burgundy color so that they stand out a bit. Don't forget the blending!

Step 12:
Apply a golden eyeshadow on the inner most corner of the eye, around the tear duct. Blend properly. I have used Smashbox Ambient.

Step 13:
Apply the plum burgundy color on your lower lash line with help of an angled or a pencil brush.

Step 14:
Now this step is totally optional. You can put a little black eye shadow on the outer V of your lid. I have used Smashbox Blackout just to add some depth to other colors.

Step 15:
Tightline your upper and lower water line with an eye pencil. I have used l'oreal 16hr infalliable carbon black eye pencil.

Step 16:
Highlight your brow bone.

Step 17:
Apply eyeliner on your upper lash line. I have used MAC Blacktrack Fluidline. Apply good coats of mascara I have used Covergirl Lash Blast Volume Mascara.
You are done! Here's the complete look:


For face~
*Urban Decay De Slick Oil COntrol Spray
*Bare Escentuals Prime Time Foundation Primer
*MAC Prep+Prime Skin Base Visage
*MAC Mineralize SPF 15 Foundation
*NARS Sheer Glow Foundation
*MAC Studio Sculpt Concealer
*MAC Mineralize Skin Finish Natural
*Smashbox Softlights in Lens and Shimmer to highlight my cheekbone
*Estee Lauder blush in Rose wood
For Lips~
*MAC Prep+Prime Lip
*NYX Mega Shine Lipgloss in Gold Pink
Let me know your opinions about the look!
Love and respect,
Eeshita.
Thank you for this beautiful tutorial. I was eager to apply red as eyeshadow but can't think about as swift (a reddish yellow-brown beautiful color blending spec) as it is! Thank you, thank you very much!
ReplyDeleteNow I am requesting for one which is very important for any makeup and that is a good base; so will u plz upload some tutorial on how to create
1) base for night party?
2) Day out?
3) for long time outing in summer?
this would be really helpful.
thank you.
Runa Rahman Sunny
aaaawwwww thanks a lot apu :D thank you thank you thank you for liking my experiment :D yeah even I was planning to do a step by step foundation routine for different time and season but I think I won't be able to do it without making any video... do you think step by step pictorial will be helpful? If so, then I can give it a try, though I am not 100% sure about it as creating a perfect base always means how you blend it :s and without video I think it won't be as graspable :/ but again thanks sista <3 means a lot!
Delete